

 |
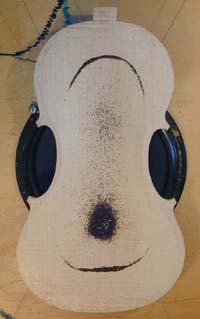
Mode #5 show's tea-leaf patternA similar test is done by placing the lower part or bottom block area of the plate centerally over the speaker, this is called mode#2 and relates to the stiffness accross the grain. I carry out both of these tests on all of my plates and keep records of same as well as the wood density, arching height and weight in order to direct me towards making accoustically better instruments. By this method one can keep a consistancy of quality, you can also choose to make a particular set of plates stiff, or less stiff according to the technique of the customer. |  |
|
| Their will be many varibles in making one instrument to the next, the height of arching, the fluting of the edge work, the density of the wood, how well it is cut on the quarter, the treatment of the wood before varnishing and the varnish etc, all of these and more will effect the performance of the instrument. When carving the plates, if you can match the mode test's between the plates, and on each plate get the mode's #2. & #5. to agree within one full tone your instrument will vibrate as a whole unit. This will make the instrument play with ease, and whitout any effort lots of hidden overtones and harmonics will fill in between the notes you play. | |||
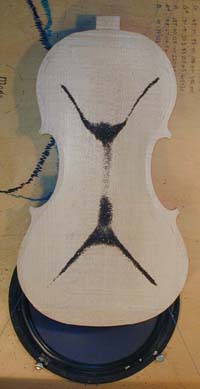 |
Mode #2 show's tea-leaf pattern.The dark area behind the plate is the speaker. When the frequency of the plate is matched the tea leaves jump and the height of the bounce can be interpeted as the amplitude. Visually one can see how lively a plate performs. For more detailed info and images on plate tuning and Chladni patterns click hereEigenmodes. | VIEW VIDEO | VIEW VIDEO |
Engineering features with acoustic qualities.
(discussion notes, march 5th 2002)
James Beatley diploma N.S.V.M.
to
Dublin Amateur Luthier Society
Rib heights and body taper
Many classical Italian violin/cello have the ribs higher at the C bouts. the effect of this on the belly will mean the belly will be glued under tension. You must consider what effect this will have on the bass-bar and the bass f hole. It would be advisable to fit the bass-bar without any tension if you are making the C bouts (rib height) higher. This practice probably comes from an engineering point of view i.e. to counteract or equalise the effect of the strings and bridge sinking the belly slightly. Also the tapering of the body from the upper bouts to the top block on the belly side may be done to counteract the pivoting effect of the neck when under tension from the strings. On older larger instruments the taper was on the back. Using a straight taper you will fit the bass-bar under tension.. What ever taper you use the main thing is to consider bass-bar tension and its effect on the belly.
Rib height.
You should consider rib height especially on violin. Adjusting the rib height on violin will have a more dramatic effect than on viola/cello. The total volume will be increased greatly by making the rib height 1 or 2 m.m. higher. The tone of a violin will change dramatically and less so on viola and cello. You should consider the arching height you wish to create in conjunction with the rib height. High arching gives more stability and strength, it also gives a better quality sound. Lower arching gives better response but looses on quality of sound. Very low arching on a cello is difficult to create. Make low arching a bit thicker. The height of the arching has an effect on the sound and projection of sound. Higher arching will have a better quality tone but not as powerful as lower arching. The difference in arching heights effect the stiffness i.e. on low arching the grain is long for longer distance. Higher arching has more end grain and more strength. The long grain of low arching will vibrate more evenly but you must allow a little more thickness for extra strength.
Placing the f hole effecting sonority.
In widening the C bout to gain more power you must consider the inclination of the ff's. The width of the bridge feet and the placing of the bass-bar. The belly vibrations between the ff's is a transverse vibration . By inclining the ff's you cut across more grains in the belly wood than if they were straight. This tends to free up the belly. Wider C bouts = Straight ff's! wider bridge ! adjust the bass-bar !!.
Fluting at the edge work
Fluting to different depths and widths will effect the power and sonority. Fluting which is short and rises quickly form the edges will be more powerful than a wider more scooped type. The point where the fluting changes direction is the weakest part. The quality of wood used will also effect power and response. Wood cut on the quarter with the medullary rays running perpendicular to the grain gives the greatest strength. Having looked at front plaster casts of Strad, del Gesù, Nicolo Amati and Gasparo de Salo, they all are similar in long central area and differ in the fluting , corners and out-line.
Purfling Making.
Materials required.
A Large enamelled pot.
Pear and maple veneers 18 inch x 6 inch. Buy twice the amount of pear.
Logwood chips: a small handful.
Ferrous sulphate/iron. half teaspoon.
Caustic soda.
Method:
1.
Cut the veneers into 18 inch x 3 inch. place the pear veneers loosely in pot and cover with plenty of water. Add about one teaspoon of caustic soda. Bring to the boil and simmer for 2 hours. This removes all the fats which help with getting a good dye penetration and gluing.
Empty off the water and rinse.
2.
Cover veneers with clean water and add a small hand-full of logwood chips. Bring to the boil and simmer for about 1 hour. Leave standing for 24 hours. The pear veneers will now be coloured purple. Empty off the water and rinse.
3.
Cover veneers with clean water and add half teaspoon of ferrous sulphate. Bring to the boil and simmer for 1 hour. Leave standing for 24 hours. The colour will now be black/grey. Empty off and rinse. Under varnish it looks black.
4.
Dry out by folding in newspaper. Fold strips in newspaper with 3 layers between veneers and lay flat with a weight to prevent buckling. Change the newspaper daily until veneers are dry.
Gluing strips together.
1.
Prepare two piece of melemine faced clamping boards 18 inch x 4 inch x 5/8 inch.
Cover these with cling film to prevent veneers sticking to board.
2.
Wet one side of the black veneer and place on board, brush thin hide glue on the other side.
3.
Take the maple and brush on glue, lay on top of the black with both glue surfaces together.
4.
Brush on glue to other side of maple. Brush on glue to the next black and place with both glue surfaces together.
5.
Wet the outside of the black. and clamp up between boards. Use as many clamps as you can get on.
6.
Dry out as before.
Red Madder Lake
This is the best source of alizarin for use in instrument varnish.
Ingredients:-
Madder root 100 grams
Aluminium Potassium sulphate 100 grams
Sodium carbonate AKA washing soda.
Lots of Distilled water ( I used tap water )
Method:
1. Wash all utensils in an alum solution. Only use enamelled pot or glass.
2. Soak the Madder root overnight in water.
3.Rinse off and cover with plenty of water and a little yeast to allow a slight fermentation, leave standing for about 3 days.
4. Put in the oven and when temp reaches 70° centigrade add 100 grams of Alum, this should be made into a solution first and then added. Continue cooking at 70° for 6-7 hours.
5. Filter and collect the water. Filter through double filter paper or two layers of fine cotton cloth to remove all particles of madder root. Allow to cool and carry out next step while still warm but not cold. You are now finished with the madder root.
6. Add the washing soda to the madder water (this causes precipitation)The washing soda should be made into a saturated solution and then mixed with water 1:1.
Make sure their is enough room in the vessel to allow for precipitation. Add the washing soda slowly while stirring. Allow to settle.
7. Continue adding washing soda until no more precipitation occurs. Allow everything to settle and then pour off the excess water.
8. At this point the red colour is fixed to the alum but you must get rid of all the washing soda or precipitation salts. By adding water allowing to settle and pouring off the excess water will eventually flush out the salts.
Do this repeatedly until no salts are present. Test by collecting some of the excess water and add a little alum, no precipitation should occur. If precipitation occurs continue washing out .
9. When all the salt is washed out , filter the precipitate from the water. Remove the precipitate before it completely dries out otherwise it may stick to the filter paper or cloth. Allow to dry by evaporation on a sheet of glass, no salts should form on the glass or filter paper.
10. Break dry precipitate into small pieces and grind dry or with water.
Purple/red pigment:
Copper sulphate can be added to the Alum at note 4 above. Use proportionally less Alum.
Notes on preparation & method:
Their is no need to grind up the madder root.
Wear rubber gloves at all time .
Only use glass or enamelled vessels. No metal pots or palette knife should come in contact with the ingredients at any stage of the process.
A glass vessel is really good because you can see the setteling of the prcipitate and can pour off the excess water.
Quick links on this page: